Trusted by 150+ Homeowners
Crawl Space Encapsulation in Greenacres, FL
- Over 154 5-Star Reviews
- Free Estimates and Quotes
- 100% Satisfaction Guaranteed
- Child, Family & Pet Safe Steps
- 24-Hour Emergency Service
- Fully Licensed & Insured

Protecting Your Greenacres, FL Home From Hidden Damage
Did you know that up to 90% of homes in Florida have some form of moisture issue in their crawl spaces? This often goes unnoticed until it causes real problems. For homeowners in Greenacres, FL, this hidden dampness can lead to serious structural issues and affect your indoor air quality. It’s a common problem, but one that we have a very specific fix for. We understand how this affects your property and your wallet.
With over 165 five-star reviews from your neighbors, our team is the trusted choice for dealing with crawl space problems. Homeowners around here know that we bring a practical, no-nonsense approach to every job. We focus on getting your crawl space sealed correctly, preventing future headaches. You get a clear explanation of what we’re doing and why it’s important.
- A properly encapsulated crawl space stops mold and mildew in its tracks, leading to healthier air inside your home.
- You’ll notice a significant reduction in energy costs because your HVAC system won’t have to work as hard to condition moist air.
- It creates a barrier against pests like rodents and insects that love damp, dark spaces, keeping them out of your living areas.
How Crawl Space Encapsulation Actually Works
The process of encapsulating your crawl space is detailed and requires precision. It’s not just about throwing down a plastic sheet. Our team follows a proven method to ensure a complete seal, preventing moisture from entering your home’s foundation. Cutting corners here means you’ll likely face the same issues again soon, costing you more in the long run. We focus on long-term protection for your property.
Step 1: Initial Inspection and Assessment
We start with a thorough inspection of your crawl space. This involves checking for existing moisture, identifying entry points for water, and assessing the overall condition. Identifying all problem areas is key before we begin. This step usually takes about an hour, depending on the size of your home.
Step 2: Cleaning and Preparation
Before we seal anything, we clear out any debris, old insulation, or standing water. Sometimes, we might need to address existing mold growth. Ensuring a clean surface is critical for the encapsulation material to adhere properly. This preparation can take a few hours to a full day.
Step 3: Installing the Vapor Barrier
We then install a heavy-duty vapor barrier, typically a thick polyethylene liner. This material covers the entire floor and sometimes extends up the walls. Creating a continuous seal prevents ground moisture from evaporating into your crawl space. This is a labor-intensive part of the job, often taking one to two days for a standard-sized home.
Step 4: Sealing Vents and Access Points
Next, we seal off all air vents and access points to the crawl space. This prevents humid outside air from entering and conditioned air from escaping. Blocking unwanted airflow is essential for maintaining a stable environment. This usually takes a few hours to complete.
Step 5: Installing a Dehumidifier (Optional but Recommended)
In many cases, we recommend installing a dedicated dehumidifier. This unit actively removes any residual moisture from the air within the encapsulated space. Maintaining optimal humidity levels ensures long-term protection against mold and musty odors. The installation itself is typically done within a day.
Ready to stop moisture problems before they start? Get a clear picture of your crawl space’s condition and a plan to fix it.

Signs Your Crawl Space Needs Encapsulation
Catching these issues early can save you a significant amount of money and prevent more serious damage to your home’s structure. Ignoring these warnings often leads to costly repairs down the line. Our team is here to help you identify these signs.
Musty Odors That Won’t Go Away
If you notice persistent musty or earthy smells, especially when you first walk into your home, it’s a strong indicator of high humidity and potential mold growth in your crawl space. Addressing the source of the smell is the first step to better indoor air.
High Humidity Levels
Feeling unusually damp or sticky air inside your home, even when the AC is running, often points to moisture issues below. Controlling humidity levels is crucial for comfort and preventing damage. This is a common problem around here.
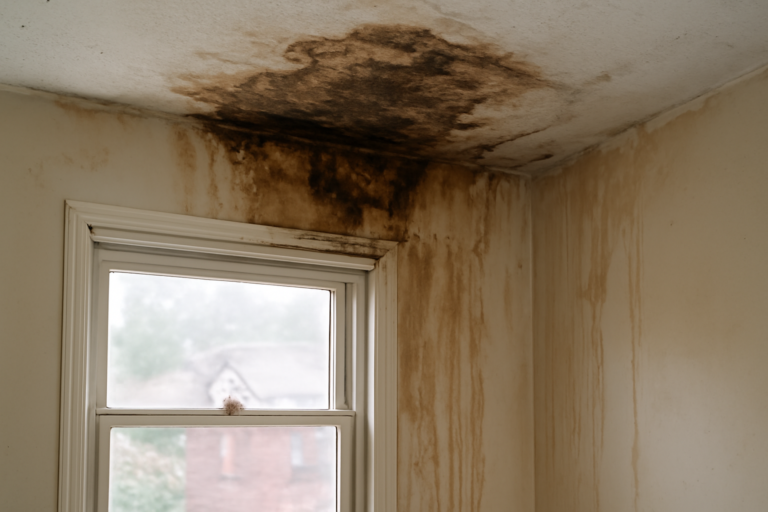
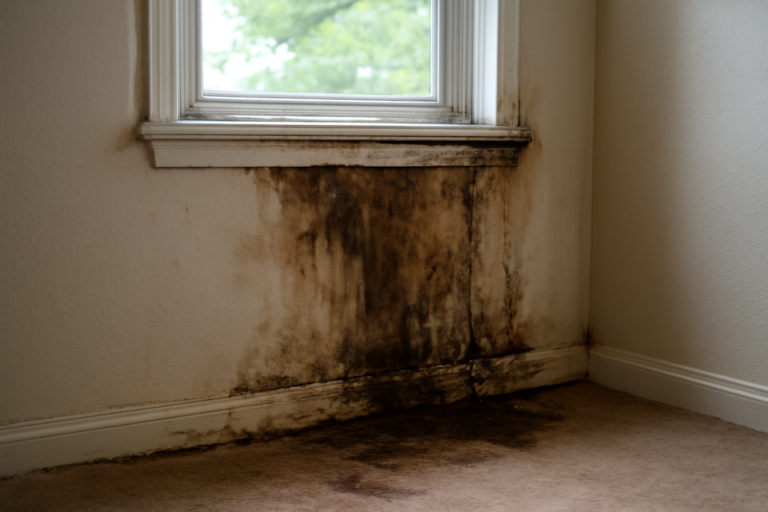
Mold or Mildew Growth
Visible patches of mold or mildew on crawl space walls, wooden beams, or stored items are a clear sign of a moisture problem that needs immediate attention. Removing mold safely is part of the encapsulation process. We’ve seen this many times.
Increased Pest Activity
A sudden increase in insects or rodents inside your home can be linked to a damp crawl space, which provides a welcoming environment for them. Securing your home’s foundation helps deter unwelcome guests. This stops them from getting in.
Warped Floors or Sagging Ceilings
Over time, persistent moisture can damage the wooden joists and subflooring, leading to noticeable issues like warped floorboards or sagging ceilings. Protecting your home’s structure is our primary goal. This prevents long-term decay.
High Energy Bills
An unsealed crawl space can act like a leaky sieve for conditioned air, forcing your heating and cooling systems to work overtime. Improving energy efficiency starts with a sealed crawl space. You’ll see a difference.
Crawl Space Encapsulation vs. DIY: When To Call a Professional
| Situation | DIY? | Call a Pro? | Why |
|---|---|---|---|
| Minor dampness on the soil | Yes, with caution | Maybe | If you’re experienced and have the right materials, a basic vapor barrier can be a start. |
| Standing water | No | Yes | Requires specialized equipment to remove water and address the source of flooding. |
| Visible mold growth | No | Yes | Requires professional assessment and safe removal to prevent health risks. |
| Extensive debris or old insulation | Maybe, with effort | Yes | Thorough cleaning and disposal can be labor-intensive and require specific tools. |
| Sealing vents and ductwork | Maybe, if handy | Yes | Improper sealing can cause new problems with airflow and HVAC efficiency. |
| Installing a permanent dehumidifier | Maybe, if you’re skilled | Yes | Requires electrical work and proper placement for optimal performance. |
While some minor DIY steps can be taken, for effective and long-lasting crawl space encapsulation, professional help is usually the best route. Our team has the tools, experience, and knowledge to do it right the first time. We ensure all potential issues are addressed thoroughly.
Crawl Space Encapsulation Cost In Greenacres, FL
The cost of crawl space encapsulation can vary significantly based on the size of your home, the extent of moisture damage, and specific local conditions in Greenacres, FL. These figures are estimates to give you a general idea.
| Service Aspect | Typical Price Range | What Affects Cost |
|---|---|---|
| Crawl Space Inspection | $100 – $300 | Complexity of assessment and reporting needs. |
| Crawl Space Cleaning | $300 – $1,000 | Amount of debris and type of waste to be removed. |
| Vapor Barrier Installation (per sq ft) | $1.50 – $4.00 | Thickness and quality of the barrier material used. |
| Sealing Vents and Access Points | $200 – $600 | Number of vents and complexity of access points to seal. |
| Mold Remediation (if needed) | $500 – $3,000+ | Severity and spread of mold infestation. |
| Dehumidifier Installation | $500 – $1,500 | Type and capacity of the dehumidifier unit chosen. |
An on-site assessment by our team provides the most accurate estimate for your specific situation. We offer free consultations to discuss your needs.
Service Areas Near Greenacres, FL
Lake Worth, Palm Springs, Lantana, Atlantis, West Palm Beach, Royal Palm Beach, Loxahatchee, Wellington, Riviera Beach, Haverhill, Hypoluxo, Manalapan, Delray Beach, Boca Raton, Highland Beach, Pompano Beach, Deerfield Beach, Coral Springs, Parkland, Coconut Creek.
Common Questions About Crawl Space Encapsulation
What is the typical timeline for a crawl space encapsulation job?
The timeline can vary, but a standard crawl space encapsulation project typically takes between two to five business days. This includes the initial inspection, cleaning, installation of the vapor barrier, sealing vents, and any necessary follow-up work. We aim for efficiency without compromising quality, ensuring your home is protected promptly.
How does crawl space encapsulation affect my home insurance claim?
Encapsulating your crawl space can actually help with insurance claims by preventing future water damage and mold growth, which are often excluded from policies. Documenting the process, which our team does, provides clear evidence of preventative measures taken. We work with your insurance company to ensure proper documentation.
Is crawl space encapsulation really necessary in our climate?
Yes, especially in a climate like ours. High humidity and occasional heavy rains mean your crawl space is constantly at risk. Encapsulation is crucial for maintaining a healthy environment and preventing structural issues caused by moisture. It’s a proactive step that saves money long-term.
What happens if my crawl space has existing mold?
If we find existing mold, it needs to be professionally remediated before encapsulation can begin. Our team has the expertise to safely remove mold and treat the affected areas. Addressing mold thoroughly is a critical part of the process to ensure your air quality improves and the problem doesn’t return.
How often do I need to maintain an encapsulated crawl space?
Once properly encapsulated, your crawl space requires minimal maintenance. We recommend annual inspections to ensure the vapor barrier is intact and the dehumidifier (if installed) is functioning correctly. This helps catch any potential issues early and keeps your system working optimally.
Check Our Other Relevant Services

Christopher Cannon: Damage Restoration Expert
Christopher Cannon is a licensed restoration specialist with more than 20 years of dedicated experience in property mitigation and disaster recovery. Known for his technical precision and authoritative industry knowledge, Christopher has spent two decades helping property owners navigate the aftermath of unforeseen damage.
𝗖𝗲𝗿𝘁𝗶𝗳𝗶𝗰𝗮𝘁𝗶𝗼𝗻𝘀: Christopher maintains a robust portfolio of IICRC certifications, including Water Damage Restoration (WRT), Mold Remediation, Applied Structural Drying (ASD), Odor Control, and Fire and Smoke Restoration. These credentials reflect his commitment to the highest safety and restoration standards.
𝗕𝗲𝘀𝘁 𝗣𝗮𝗿𝘁 𝗼𝗳 𝘁𝗵𝗲 𝗝𝗼𝗯: He finds the greatest satisfaction in being the “calm during the storm,” helping families feel secure as they watch their property return to a safe, healthy state.
𝗙𝗮𝘃𝗼𝗿𝗶𝘁𝗲 𝗣𝗮𝘀𝘁𝗶𝗺𝗲: An avid outdoorsman, Christopher enjoys mountain biking and spending quality time with his family.