Trusted by 150+ Homeowners
Crawl Space Encapsulation in Pinecrest, FL
- Over 154 5-Star Reviews
- Free Estimates and Quotes
- 100% Satisfaction Guaranteed
- Child, Family & Pet Safe Steps
- 24-Hour Emergency Service
- Fully Licensed & Insured

Tackling Dampness Underneath Your Pinecrest Home: Crawl Space Encapsulation
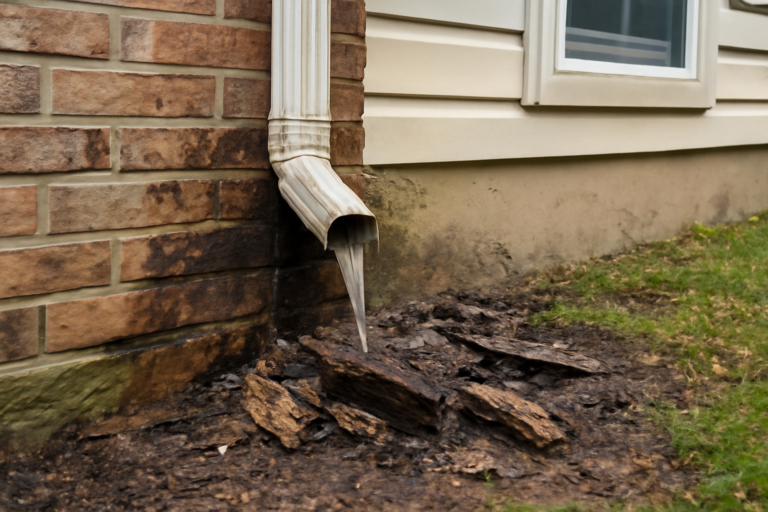
Here in Pinecrest, FL, we all know how the humidity can climb, especially during those long summer months. That constant moisture isn’t just uncomfortable; it’s a direct invitation for trouble to set up shop right beneath your floors. We’re talking about damp, musty crawl spaces that can lead to serious issues for your home’s structure and your family’s health. Protecting your biggest investment means addressing these hidden threats before they become obvious problems. Keeping your crawl space dry is more important than you might think, and it starts with understanding what makes it vulnerable.
We’ve helped over 165 local families secure their homes against moisture intrusion, earning more than 165 five-star reviews from happy neighbors. When it comes to safeguarding your property from the unique challenges our South Florida climate presents, homeowners trust our team for expert Crawl Space Encapsulation. You can count on us to bring practical knowledge and a commitment to doing the job right, the first time. We know you want reliable protection for your home and a clear explanation of what we do.
- A properly encapsulated crawl space dramatically improves your indoor air quality by preventing mold, mildew, and musty odors from circulating upstairs.
- Encapsulation creates a moisture barrier, safeguarding your home’s foundation and wooden structures from rot and pest infestations that thrive in damp environments.
- You’ll likely notice a difference in your home’s energy efficiency, as a sealed crawl space helps regulate temperature and reduces the strain on your HVAC system.
How Crawl Space Encapsulation Actually Works
Getting your crawl space encapsulation done right is crucial. It’s not just about slapping up some plastic; it’s a meticulous process that requires attention to detail and the right materials. When corners are cut, you’re left with a system that can fail, leading to persistent moisture problems and wasted money. Our team follows a proven, thorough method to ensure your crawl space is sealed effectively, giving you long-lasting protection against humidity and its damaging effects. We believe in educating you on the process so you know exactly what to expect.
Step 1: Thorough Inspection and Preparation
Before we do anything, we’ll carefully inspect your crawl space to assess its current condition, identify any existing moisture sources, and measure the area. This initial assessment is key to developing a tailored plan. We’ll clear out any debris or old insulation that could interfere with the encapsulation process. This step typically takes a few hours, depending on the size and condition of your crawl space, and it sets the stage for effective moisture control.
Step 2: Addressing Existing Moisture Issues
If we find standing water, we’ll address it first. This might involve installing a sub-floor drainage system or a sump pump to manage water flow. We also check for and repair any leaks from plumbing or foundation cracks. This ensures that the encapsulation materials aren’t installed over existing water problems, which would defeat the purpose. This phase’s duration depends entirely on the severity of the moisture, but it’s vital for long-term encapsulation success.
Step 3: Installing the Vapor Barrier
This is where the magic happens. We’ll install a heavy-duty, multi-layer vapor barrier, often made of reinforced polyethylene, covering the entire crawl space floor and up the foundation walls. We meticulously seal all seams and penetrations, like pipes and support columns, using specialized tapes and sealants. This creates a robust barrier, preventing ground moisture from entering your crawl space. This part of the job usually takes one to two days for a standard-sized crawl space, creating a solid moisture barrier.
Step 4: Sealing Vents and Access Points
To truly seal off your crawl space from the outside elements, we’ll seal all crawl space vents. We also ensure your crawl space access door or hatch is properly sealed and insulated. This prevents humid outside air from entering and conditioned air from escaping, contributing to better indoor comfort and energy savings. Properly sealing these openings is a quick but critical step that takes just a few hours to complete, ensuring a fully contained environment.
Step 5: Installing Dehumidification (Optional but Recommended)
For many homes in our humid climate, we recommend installing a dedicated crawl space dehumidifier. This unit actively removes any residual moisture from the air within the encapsulated space, maintaining optimal humidity levels. It’s an extra layer of protection that ensures your crawl space stays dry and healthy year-round. The installation of a dehumidifier typically takes a few hours and provides continuous air quality control.
Don’t let a damp crawl space compromise your home’s integrity. Reach out to our team today for a free inspection and learn how encapsulation can protect your property. We’re ready to help you achieve a healthier home.

Warning Signs You Need Crawl Space Encapsulation
Catching these issues early can save you a lot of headaches and money down the line. Your crawl space is out of sight, but it shouldn’t be out of mind. Paying attention to the subtle signs can help you prevent much bigger problems. We want to empower you to spot these issues before they escalate. Early detection is key to protecting your home.
Musty Odors That Won’t Go Away
If you’re noticing a persistent damp, musty smell that seems to be strongest on your lower floors, it’s a clear indicator of moisture and potential mold growth in your crawl space. This smell often creeps into your living areas, making your home feel less inviting. Ignoring this warning sign can lead to significant mold remediation down the road, so addressing odors promptly is smart.
High Humidity Levels Indoors
Does your home feel unusually clammy or humid, even when your air conditioning is running? This can be a sign that moisture from your crawl space is entering your living space and overwhelming your HVAC system. You might also notice condensation on windows or pipes. This indicates a serious moisture problem needing professional attention.
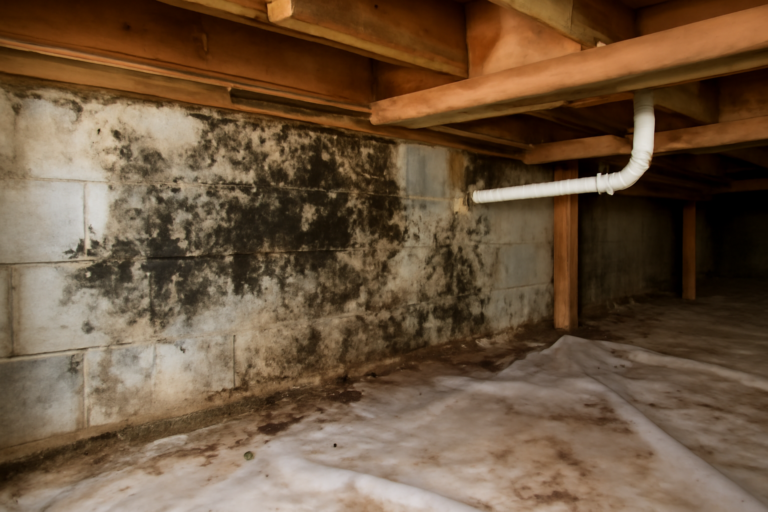
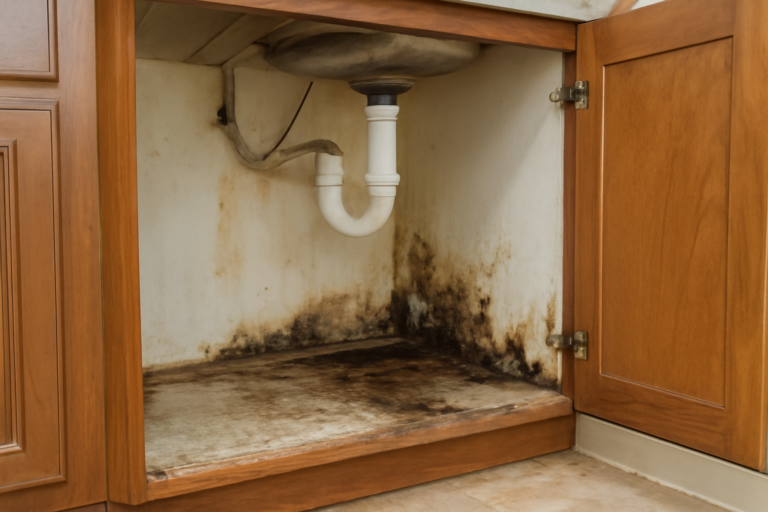
Visible Mold or Mildew Growth
If you’ve had a reason to venture into your crawl space and seen fuzzy patches of mold or mildew on the walls, floor, or wooden joists, it’s a direct sign of excessive moisture. This is not only damaging to your home’s structure but also poses health risks. It’s a clear call for immediate moisture control.
Increased Pest Activity
Insects like termites, cockroaches, and ants, as well as rodents, are attracted to damp, dark environments. If you’re noticing a sudden increase in pest activity inside your home, especially on lower levels, your crawl space could be the culprit. They find a welcoming habitat in moist conditions, so reducing crawl space moisture is essential.
Warped Flooring or Sagging Ceilings
Long-term moisture exposure can weaken the wooden structures supporting your floors and ceilings. This can lead to noticeable issues like warped hardwood floors, soft spots, or even visible sagging in ceilings. These are often costly repairs that stem from a neglected crawl space, highlighting the need for structural moisture protection.
Deteriorating Insulation
When insulation in your crawl space becomes damp and compacted, it loses its effectiveness. In humid conditions, it can even start to break down or become a breeding ground for mold. This leads to higher energy bills and a less comfortable home. Replacing or remediating damaged insulation is a common sign that your crawl space needs better environmental control.
Crawl Space Encapsulation vs. DIY: When To Call a Professional
| Situation | DIY? | Call a Pro? | Why |
|---|---|---|---|
| Covering the floor and walls with a basic plastic sheet | Yes, for a temporary fix | Yes, for a lasting solution | Professional-grade materials and sealing techniques are far more durable and effective. |
| Sealing obvious large holes in the barrier | Yes, if you’re careful | Yes, for complete integrity | Missing even small gaps can compromise the entire system, allowing moisture to enter. |
| Removing visible mold growth without proper protection | Absolutely Not | Yes, with proper safety gear | DIY mold removal without containment and respiratory protection is dangerous for your health. |
| Installing a sump pump or drainage system | No, unless you’re experienced | Yes, for proper function | These systems require knowledge of plumbing and electrical work to function correctly and safely. |
| Dealing with standing water or active leaks | No, this needs expert assessment | Yes, immediately | Active water issues require immediate professional intervention to prevent further damage. |
| Attaching the vapor barrier securely and sealing all seams | Difficult for a DIYer | Yes, for guaranteed protection | Proper adhesion and sealing techniques ensure the barrier remains effective against ground vapor. |
While some minor DIY tasks might seem appealing, when it comes to creating a truly effective and lasting barrier against moisture, professional Crawl Space Encapsulation is the way to go. Our team has the specialized equipment, materials, and knowledge to ensure the job is done right, protecting your home’s foundation and your indoor air quality. We offer expert installation and lasting results.
Crawl Space Encapsulation Cost In Pinecrest, FL
The cost of Crawl Space Encapsulation in Pinecrest, FL can vary significantly based on the size of your crawl space, the extent of existing moisture damage, and the specific materials and systems needed for your home. These figures are general estimates and not a guarantee of price. We provide clear, upfront pricing after a thorough assessment.
| Service | Typical Price Range | What Affects Cost |
|---|---|---|
| Crawl Space Inspection and Assessment | $150 – $500 | Complexity of issues, size of the area, and detailed reporting needs. |
| Debris Removal and Site Preparation | $300 – $1,000 | Amount of debris, accessibility of the crawl space, and any necessary demolition. |
| Vapor Barrier Installation (6-mil to 20-mil) | $1,000 – $4,000 | Square footage of the crawl space, thickness and quality of the barrier material. |
| Sealing Vents and Access Points | $200 – $600 | Number of vents and hatches, and the complexity of sealing them effectively. |
| Sump Pump Installation | $500 – $1,500 | Type of pump, complexity of plumbing and electrical work required. |
| Dehumidifier Installation | $600 – $2,000 | Size and features of the dehumidifier, and the ease of electrical and drainage hookups. |
We offer free, no-obligation estimates for Crawl Space Encapsulation services. Our technicians will assess your specific needs and provide a detailed breakdown of the costs involved. Getting a professional quote is the best way to understand the investment in your home’s protection.
Service Areas Near Pinecrest, FL
We proudly serve homeowners throughout the area, including these nearby communities: Miami, Coral Gables, Kendall, South Miami, Palmetto Bay, Cutler Bay, Homestead, Florida City, Doral, Hialeah, Miami Gardens, North Miami, Sunny Isles Beach, Aventura, Bal Harbour, Surfside, Key Biscayne, Pinecrest, Miami Shores, North Bay Village.
Common Questions About Crawl Space Encapsulation
How long does crawl space encapsulation take?
For a typical home in our area, a full Crawl Space Encapsulation project usually takes between two to four days to complete. This timeframe includes thorough inspection, preparation, installation of the vapor barrier, sealing vents, and any necessary additional components like a dehumidifier. The exact duration can depend on the size of the crawl space and any pre-existing conditions we need to address, but we always aim for efficiency without sacrificing quality.
Is crawl space encapsulation expensive?
The cost of Crawl Space Encapsulation can vary, but many homeowners find it to be a worthwhile investment for the protection it provides. While there’s an upfront cost, it often pays for itself over time through improved energy efficiency and by preventing costly repairs related to moisture damage, mold, and pest infestations. We offer free estimates to give you a clear picture of the investment for your specific home.
Will encapsulation help with my allergies?
Yes, absolutely. A primary benefit of Crawl Space Encapsulation is the significant improvement in indoor air quality. By preventing mold, mildew, dust mites, and other allergens from growing and circulating from the crawl space into your living areas, encapsulation can lead to healthier air for your family. Many homeowners report a reduction in allergy symptoms after the service.
What happens if I don’t encapsulate my crawl space?
If you skip encapsulation in our humid climate, you’re leaving your home vulnerable to a host of problems. Moisture will continue to seep into your crawl space, feeding mold and mildew, potentially damaging your home’s wooden structures, attracting pests, and increasing your energy bills. It can also contribute to poor indoor air quality. Addressing this proactively with encapsulation is about preventing future damage and maintaining your home’s value.
Can I seal my crawl space vents after encapsulation?
Yes, sealing crawl space vents is a crucial part of the encapsulation process. Traditionally, vents were meant to allow air circulation, but in humid climates like ours, they often let in more moist air than they let out, contributing to the problem. Our team properly seals these vents as part of the encapsulation to create a controlled, dry environment beneath your home.
Check Our Other Relevant Services
- Antimicrobial Treatment Services in Pinecrest, FL
- Burst Pipe Water Damage Restoration in Pinecrest, FL

Christopher Cannon: Damage Restoration Expert
Christopher Cannon is a licensed restoration specialist with more than 20 years of dedicated experience in property mitigation and disaster recovery. Known for his technical precision and authoritative industry knowledge, Christopher has spent two decades helping property owners navigate the aftermath of unforeseen damage.
𝗖𝗲𝗿𝘁𝗶𝗳𝗶𝗰𝗮𝘁𝗶𝗼𝗻𝘀: Christopher maintains a robust portfolio of IICRC certifications, including Water Damage Restoration (WRT), Mold Remediation, Applied Structural Drying (ASD), Odor Control, and Fire and Smoke Restoration. These credentials reflect his commitment to the highest safety and restoration standards.
𝗕𝗲𝘀𝘁 𝗣𝗮𝗿𝘁 𝗼𝗳 𝘁𝗵𝗲 𝗝𝗼𝗯: He finds the greatest satisfaction in being the “calm during the storm,” helping families feel secure as they watch their property return to a safe, healthy state.
𝗙𝗮𝘃𝗼𝗿𝗶𝘁𝗲 𝗣𝗮𝘀𝘁𝗶𝗺𝗲: An avid outdoorsman, Christopher enjoys mountain biking and spending quality time with his family.